Prelude
Mostly we have a single PC or Laptop at home, and we want to use both the Windows and Linux on the same machine but sometimes we are afraid of losing data because of the tedious procedure of dual boot installation. I have also been afraid of losing my data due to this tedious process, but then I thought that I can take chance by backing up my data to external drive. So, I took the chance, a couple of times failed and then I was successful. I will be discussing all scenarios of failure and success in details for you to know the correct path before installation of dual boot operating systems.
First thing first, I will be installing Windows Operating System at first place and then I will install Ubuntu Operating System in dual boot configuration. So let's start with the scenarios.
Dual Boot Installations (Failure and Success Scenarios)
Machine Information
Dell Latitude 3340 Laptop
Operating System1
Following information can be found in the properties of Computer Icon
Edition: Windows 10 ProVersion: 20H2OS Build: 19042.1706
Operating System2
Ubuntu 20.04
Procedure Followed
1. Windows 10 was already installed on my machine and I downloaded Ubuntu latest distribution ISO file from UBUNTU official website (Install Ubuntu desktop | Ubuntu).
2. Download latest distribution of Rufus from official website (Rufus - Create bootable USB drives the easy way).
 |
| Settings for Creating Ubuntu Installation USB |
3a. Insert 4 GB or above USB Drive. (Save any important data on you USB Drive prior starting the operation because data on the USB Drive will be lost.)
3b. Insert the USB Drive and you will see that Rufus will automatically detects the device.
3c. Press SELECT button and browse to select the downloaded ISO image of Ubuntu downloaded from Step1.
3d. Do not change any other settings on Rufus and make sure that the Rufus settings are similar to the settings shown in picture above.
3e. Press START button and let the process complete. (You will be warned by Rufus regarding your data on USB Drive will be lost, press OK if there is no valuable data on the USB Drive. Next popup window will show the Ubuntu settings. Simply press OK and let the process begin.).
4. After the preparation of Bootable USB, you will need to free up space for installation of Ubuntu. Recommended space is 20GB, but it depends on available space and your desire to allocate free space for Ubuntu Operating System. In my case I will be allocating 100GB space for the Ubuntu Operating System. Steps to allocate free space are as follows:
 |
| Computer Management Tool Window |
4b. Now select "Disk Management" under the "Storage" in the left pane. You will see the available disks and partition information as shown in the picture.
4c. Choose Drive and right click to select "Shrink Volume...". You will be able to shrink the existing volume which is dependent upon the availability of free space in your selected drive.
4d. Shrink the volume as per your requirement from within the free space available on the drive and you are all set.
5. Insert your USB bootable drive which you have created in step 3 and restart your computer. Make sure that Boot Options are set to boot from USB as a first option in your machine's BIOS. If not, first jump into BIOS by pressing F2 or F12 and change the boot Order and save before exiting the BIOS.
6. As soon as the system restarts, you will see the Ubuntu Booting.
 |
| Try or Install Ubuntu |
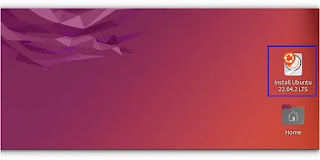
8. Click on the Icon "Install Ubuntu xx.xx.xx" to start the installation as shown in the picture below.
 |
| Start Installation of Ubuntu xx.xx.xx |
9. Select Language and Keyboard Layout in next two screen as shown in picture below:
 |
| Select Language and Keyboard Layout |
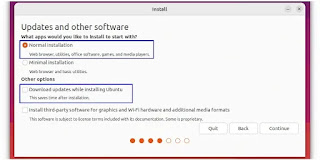
10. Select installation type for the Ubuntu Operating System. In my case, I have opted normal installation as shown in the picture below and I recommend to opt this for you as well.
 |
| Installation Type - Normal Installation |
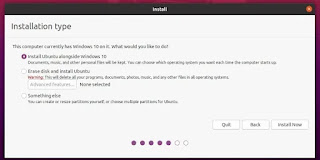
11. Here comes the different installation scenarios that I have tested to show the results so that you don't have to try these on your machine, and you could save your data and time. There are three installation options as shown in the picture below.
 |
| Ubuntu Critical Installation Options for Dual Boot Settings |
I will be showing following 2 confusing options.
b. Something else
Scenario 1 - Install Ubuntu Alongside Windows 10 (Failure Scenario)
As a newbie, this option seems very suitable as the detail of this installation option states "Documents, Music and other Personal Files will be kept. You can choose which operating system to select each time system starts-up.". This option seems very good as you will not have to get your hands dirty with the creation of hard drives for installation and installation widard will do it for you automatically.
Hence I chose the option and the result was not much as desired. My Windows was there and it contained all the software and data as promissed by the Ubuntu Installation Wizard. I also could select either of the Operating Systems at the start up. BUT each time after rebooting the machine, before getting into the boot menu for selection of operating systems, there was an irritating error on the screen stating "Invalid Partition Table. Press any key to continue...".
So we can safely say that this option is not a total failure but still the error message ruins the enjoyabe moment of selection of desired operating system.
Scenario 2 - Something Else (Success Scenario)
As a last resort, I decided to reinstall all the operating systems but I first tried to install only Ubuntu and remove the existing partitions which carried Ubuntu Operating System.
Note: So here we go. I would strongly recommend following the steps carefully because these steps are the bit tricky and very important steps which will ensure that you do not lose your Windows Operating System and data within your machine and install Ubuntu Operating System in dual boot configuration with Windows Operating System.
12. Referring to the step 11 of this blog, select "something else" and press Next. You will be presented with the next screen as shown in the picture below, displaying all the hard drives along with the existing partitions as well as the free space which you will utilize in the upcoming steps.
 |
| Setup Screen for Creation and Selection of Partitions |
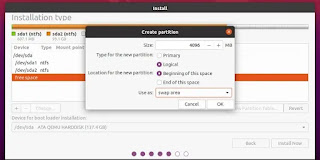
13. Click on the free space and select + button for creation of new partition. A small popup window will appear as displayed in the picture below:
 |
| Create New Partition |
14. First we will create small partition of size "500MB", with type of partition as "Primary" and Use as "EUFI bootable" and press ok. This will create a bootable partition for Ubuntu operating system.
15. Next we will again select free space and press + button to create new partition. This time we will not change the Size option and let Ubuntu use all available free space for this partition. Select type as "Primary" and Use ass will be "Ext4 Journalling file system". You will see a new text field with the caption Mount Point before OK or Cancel buttons, type "/" as a mount point and press OK.
You are all setup. Simply select your "/" partition and press Install Now option. Wizard will ask you a couple of questions including Username, System Name and Password information as well as time zone. Fill in the information as per your desire and press Install Now button. Tada, your operating system is being install.
At the end of the installation, you will be asked by the wizard to continue testing or restart. Do as you desire. If you select restart, remove the Bootable USB Drive and you will see the GRUB2 displaying Ubuntu as your default Operating System and Windows as secondary option. go ahead and try both options one after another and enjoy your success.
There are options to change the GRUB2 customizations and bring Windows as your default operating system as well as change the default timer from 30 seconds as per your wish or requirement. I will be coving this topic in my upcoming blogpost. So, stay tuned.
regard

Comments
Post a Comment