Binding AWS VPS IP Address with Hostinger Subdomain

Bind AWS IP with Hostinger Sub-Domain To bind an AWS IP address to a Hostinger subdomain, you need to update the DNS records of your Hostinger domain to point to the AWS IP address. Here’s a step-by-step guide to achieve this: Step1: Find the AWS IP Address If you have an EC2 instance, you can find the IP address in the AWS Management Console under the "Instances" section. Note the Public IPv4 address. Step2: Access Hostinger DNS Management Log in to your Hostinger account. Go to the "Domains" section and select the domain for which you want to configure the subdomain. Navigate to the "DNS Zone" or "DNS Settings" for that domain. Step3: Create a Subdomain and Point to AWS IP In the DNS settings, create a new A record. Set the "Name" or "Host" field to your subdomain (e.g., subdomain.yourdomain.com ). Set the "Points to" or "Value" field to your AWS IP address. Set the TTL (Time to Live) to the default value...

ASIC - Remove System Reserved Partition (Solved)

This blogpost is about the solution of system reserved partition which is causing trouble in creating primary workable partition in your Windows 10 and Windows 11 machine.

Problem Statement

I was trying to install Ubuntu in dual boot configuration alongside Windows 10 which was already installed on my Dell Latitude 3340 laptop. As soon as I reached the option of hard drive selection, Ubuntu showed "unusable space" at hard disk and upon searching over google, I came to know that that there can only be 3 Primary Partitions along with 128 logical partitions on a hard drive or there can be only 4 primary partitions at a hard drive and the remaining space would be considered as "unusable space" and cannot be used unless you merge it to one of your existing partitions.

Findings and Way Forward

I cancelled the installation and booted into the Windows 10 where upon opening the Computer Management and then Disk Management was able to see the 3 primary partitions (C, Recovery Partition and System Reserved) as shown in the picture below:

Disk Management Tool in Windows 10

I wanted to know what each partition was doing there. C drive makes sense as it contains all my data and the Status Field also shows that it is a primary partition also containing Boot, Page File and Crash Dump. Now see the picture, there are another couple of partitions, Recovery Partition and Reserved partition. I assigned drive letter to the System Reserved partition and there was boot information available, which clearly identifies that if we delete this partition then our machine will not be able to boot into the Windows anymore and we may also lose all the data available in our C Drive. So the next option was to look into the details of Recovery Partition. I tried to right click on the partition to assign it a drive letter but I was not allowed by the Windows. So I thought why don't we delete this partition somehow and then I will be able to create 2 primary partitions for the installation of Ubuntu in dual boot configuration as desired.

I searched the google to look for purpose of Recovery Partition and if it is not essential then remove it to move forward with my Ubuntu Installation in dual boot configuration. Upon searching over google, I came across multiple advises which more or less stated similar argument which encouraged me to go ahead and remove this Recovery Partition. The statement is as under:

"When creating a recovery partition for Windows, it's best to store it on an external drive, in case something happens to your computer. After saving it somewhere else, you can delete the recovery partition from your PC to free up space."

Solution Steps

Here are the steps I followed to get rid of the Recovery Partition from my machine.

1. Search Windows Power Shell on Windows Find Field as shown in the picture below:
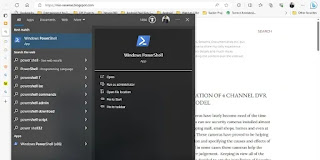
Search Windows Power Shell in Windows 10

2. Select "Run as Administrator" option to run the Power Shell.
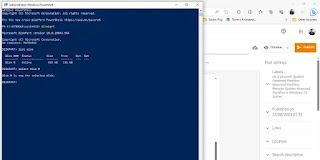
3. Type "diskpart" and press enter. (As a result, you will see number of physical hard disks in the machine) as shown in the picture below:
Diskpart Showing Physical Hard Disks in Machine

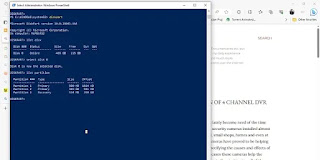
4. Select your active disk, like in my case it is Disk 0 using "Select Disk 0", result will be as shown in picture below:
Power Shell Showing Selected Disk

5. Now type "List Partition" and press enter. (This will show all partitions available on your selected disk). Following is the result in my case as shown in picture below:
Power Shell Showing Result of List Partition Command

6. In my case as you can see in the picture 1 shows recovery partition of size 534 MBs and in the picture above the partition no 3 is the recovery partition which is required to be removed. Now type "Select Partition #" in my case it would be "Select Partition 3" and press enter. You will receive message "Partition 3 is now the selected partition.".

7. now type "Delete Partition Override" and press enter. The selected partition will be deleted and following will be the result of this command as shown in picture.
Result of Delete Partition Override Command

Now you are all set as the desired partition has been deleted in above 7 simple steps.

I hope you will find this blogpost helpful. Kindly comment your point of view or suggestions.

Regards,


Comments

Popular posts from this blog

ASIC - Adsense1 or Adsense2 Error (Solved)

Whenever one tries to save the HTML Template of Blogger, some error appears in the left bottom corner. One of these errors is "The widget settings in widget with id <b>AdSense1</b> is not valid. An internal error occurred. Please try again." or  "The widget settings in widget with id <b>AdSense2</b> is not valid. An internal error occurred. Please try again." . Here is a simplest solution to the problem. Follow the below given steps to resolve this problem. 1. Click on the Jump to Widget button as shown in the picture 1. You will see list of all active widgets here. 2. Select the widget Adsense1 or Adsense2 according to your error message. The code for Adsense1 or Adsense2 as per your selection will appear as shown in selected code in picture 2. 3. Add following code in the place as below. BLACK color code is the Actual Code just copied for your infomation. Code in RED color is the code which you will add in the beginning and ending.      ...

5 Things You Need to Know About AI: Debunking the Myths

Artificial Intelligence: Unveiling the Truth AI is thought to be dominating and job-stealing globally, but are these the exaggerations or the reality? Is there any truth behind it? In this blog post, we'll discuss the facts about AI and try to unfold the facts about AI. The Origins and Applications of AI AI isn't new and we can track it back to 1940's where the artificial neural networks operated as the employees interconnected and learning how to manage the problems in given time. But now, there is an extesive role of AI from suggesting the movies, music, to every aspects of life. AI is continously growing, generating and gathering the productive data over the human responses.  The Limits of AI This is the fact that the AI can not actually experience or think. Even the AI based chatbot like Chat GPT is a complex algorithum facility that can analyze the general communication patterns. Despite the fact that these chatbots can provide resonable answers, they lack true underst...

ASIC - Hikvision DVR 5 Beeps Problem (Solved)

In continuation to my previous blog " PREPARING HIKVISION 4 CHANNEL DVR DS-7100 FOR INSTALLATION AND PASSWORD RESET (SOLVED) "which is part-1 of My Main Topic " Installation of 4 Channel DVR in DIY Model ". After getting into the DVR settings, I was confident enough to install the cameras at desired locations at my home connected the DVR with 2 of 3 cameras I have. There is some problem with the third camera, which I will be discussing later. In the current blog post I will be discussing another issue faced by me, that is, 5 Beeps when whole system got connected and I was already viewing the display of 2 cameras on my led TV.  First of all, I thought that there must be some hardware issue keeping in view the history of other hardware I have dealt in past, hence I started searching online for possible cause and its solution. I found a few blogs and YouTube videos suggesting hard disk problem which I then tried to identify in my DVR but there was no such issue as hard...