Binding AWS VPS IP Address with Hostinger Subdomain

Bind AWS IP with Hostinger Sub-Domain To bind an AWS IP address to a Hostinger subdomain, you need to update the DNS records of your Hostinger domain to point to the AWS IP address. Here’s a step-by-step guide to achieve this: Step1: Find the AWS IP Address If you have an EC2 instance, you can find the IP address in the AWS Management Console under the "Instances" section. Note the Public IPv4 address. Step2: Access Hostinger DNS Management Log in to your Hostinger account. Go to the "Domains" section and select the domain for which you want to configure the subdomain. Navigate to the "DNS Zone" or "DNS Settings" for that domain. Step3: Create a Subdomain and Point to AWS IP In the DNS settings, create a new A record. Set the "Name" or "Host" field to your subdomain (e.g., subdomain.yourdomain.com ). Set the "Points to" or "Value" field to your AWS IP address. Set the TTL (Time to Live) to the default value...

ASIC - Hikvision DVR Unbind (Solved)

In continuation to my previous blog "PREPARING HIKVISION 4 CHANNEL DVR DS-7100 FOR INSTALLATION AND PASSWORD RESET (SOLVED)"which is part-1 of My Main Topic "Installation of 4 Channel DVR in DIY Model". After getting into the DVR settings, and solving the 5 beeps problem, the device started working perfectly but the display was on local screen installed within home but displayed data on my cell phone was yet to be done.

First thing first, I started searching google for the simplest solution to get the display on my phone. I went across a lot of blogs and videos on YouTube. There are so many similar methods once again, so I also opted one of  the most common method which was to install Hik-Connect tool for android from Android Play Store and try to bind the device using the QR code from Configurations of my DVR. It could not bind because DVR was already bound with the cell phone number of first owner. I again went to the google for searching for the solutions of unbinding DVR and Bind it using my credentials. I came across multiple similar options using SADP tool to unbind the DVR from previous owner. Most of the solutions contained very simple steps, here let me briefly explain:


SADP Tool
1. Install and open the latest SADP tool, here is a catch, make sure that your DVR and SADP tool are on the same wired/wireless network.

PS: I have faced issue during installation of SADP tool on Windows 10 (SOLVED). This issue has been covered in details in another post, link attached

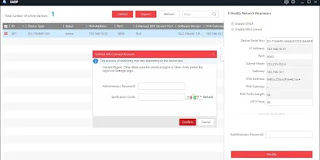
2. If everything is in order then your DVR will appear in the window when you open SADP tool as shown in the picture on the right. Select the Checkbox to get the information on right window as shown in the picture on the right.


SADP Tool Unbind Window
3. There is a red button on the top on the SADP tool window "Unbind" as shown in the picture at right. Click it, a new pop-up window will appear with two text fields "Administrative Password" and "Verification Code".

Enter the Current Administrative Password and Verification Code displayed in the small captcha code as it is.

4. Press Submit Button and it is supposed to work for most of the DVRs, but not in my case.

Solution

So next option as per the internet was to upgrade the firmware of my DVR which I could do but it is always risky. I didn't want to take that risk so instead I preferred to contact the first owner of my DVR and request him to unbind the device from his Hik-Connect Software.

The gentleman was so generous to help me out the very next morning and my device was free to bind with the Hik-Connect App on my android.

Comments

Popular posts from this blog

ASIC - Adsense1 or Adsense2 Error (Solved)

Whenever one tries to save the HTML Template of Blogger, some error appears in the left bottom corner. One of these errors is "The widget settings in widget with id <b>AdSense1</b> is not valid. An internal error occurred. Please try again." or  "The widget settings in widget with id <b>AdSense2</b> is not valid. An internal error occurred. Please try again." . Here is a simplest solution to the problem. Follow the below given steps to resolve this problem. 1. Click on the Jump to Widget button as shown in the picture 1. You will see list of all active widgets here. 2. Select the widget Adsense1 or Adsense2 according to your error message. The code for Adsense1 or Adsense2 as per your selection will appear as shown in selected code in picture 2. 3. Add following code in the place as below. BLACK color code is the Actual Code just copied for your infomation. Code in RED color is the code which you will add in the beginning and ending.      ...

ASIC - Change GRUB 2 Boot Order (solved)

 I was using Windows 10 Pro on my Dell Latitude 3340 Laptop but due to some work requirement I needed to install Ubuntu 22.04, details to is available in my earlier blog-post " Dual Boot Windows and Ubuntu (Solved) ". After the installation, the default OS in boot menu displayed by GRUB 2 is Ubuntu which sometimes irritates as most of my work is being handled in the Windows environment, moreover, i wanted to change the delay time from 30 seconds to 10 seconds in order to avoid further unnecessary delay. So, as usual, i went across the google and watched multiple videos and blogs in order to see the correct method of solving my problem. The easiest and the ultimate way of changing the boot order in GRUB 2 is presented below: 1. You will need "grub-customizer" for the subject task. Note: grub-customizer is not available in the distribution packages and cannot be installed with simple "sudo apt install grub-customizer" command at terminal. The package is av...

ASIC - Titan Submersible - Catastrophic Incident

Titan Submersible Stats of Titan Name: TITAN ( previously Known as  Cyclops 2 ) Owner / Company: OceanGate Project Completion: 2018 Weight: 9,525 kg (21,000 lbs) Speed: 3 knots (3-1/2 miles per hour) Propeller: Electric Thrusters Life-Support System: Enough to keep five people alive for up to 96 hours Test depth:   Up to 4,000 m (13,000 ft) Capacity:  5 people Crew:  1 x pilot,  1 x technical expert,  3 x mission specialists/passengers Manufacturing Material: Walls: Carbon-fiber walls (5 inches ~ 13 cm thickness) Domes: T itanium Domes ( capped at each end ) Development Status:   Experimental (Risk of Injury or Death) Length: 6.7 m (22 ft) Beam: 2.8 m (9 ft 2 in) Height: 2.5 m (8 ft 2 in) History of Titan In 2013, OceanGate began working with the Applied Physics Laboratory (APL-UW) at the University of Washington to develop a titanium-hulled composite carbon fiber submersible with the tentative name Cyclops 2; OceanGate signed a settlement ...